Step-by-Step Guide to Cable Cleat Installation: Safe and Effective Methods
- Nasco Corp
- Jun 24, 2025
- 4 min read

Updated: Jun 30, 2025

Cable cleats are essential for securing electrical cables, ensuring safety, and maintaining system reliability. Whether you're working on indoor or outdoor installations, proper cable cleat installation prevents cable damage, enhances longevity, and complies with safety standards. To install cable cleats, select the right cleat type, measure and mark fixing points, secure the cleats with appropriate fasteners, and inspect for alignment and tightness. This guide provides a detailed, step-by-step process, expert insights, and troubleshooting tips to ensure a flawless installation.
What Are Cable Cleats and Why Are They Important?
Cable cleats are devices used to fix, retain, and support electrical cables, preventing movement due to weight, vibration, or short-circuit forces. According to the International Electrotechnical Commission (IEC 61914), cable cleats must withstand mechanical and environmental stresses to ensure safety.
Safety: Prevents cable insulation damage, reducing fire or electrical hazards.
Compliance: Meets standards like BS EN 50368 for industrial installations.
Durability: Extends cable lifespan by minimizing stress and wear.
Real-Life Example: In a 2023 industrial project in Texas, improper cleat installation led to cable sagging, causing a short circuit and $50,000 in damages. Proper installation could have prevented this.
Step-by-Step Cable Cleat Installation Process
Follow these steps to install electrical cable cleats correctly, optimized for both indoor and outdoor applications.
Step 1: Select the Right Cable Cleat
Choosing the correct cleat depends on cable type, diameter, and environmental conditions.
Types: Single-way, trefoil, or multi-way cleats for different cable configurations.
Materials: Stainless steel for outdoor use, plastic for indoor non-corrosive environments.
Standards: Ensure compliance with IEC 61914 or local codes.
Pro Tip: Use a cable cleat sizing chart to match cleat dimensions with cable diameters.
Step 2: Gather Tools and Materials
Prepare the following for a smooth installation:
Tools: Drill, screwdriver, measuring tape, spirit level, torque wrench.
Materials: Cable cleats, bolts, washers, wall plugs (for masonry).
Safety Gear: Insulated gloves, safety glasses, hard hat.
Step 3: Plan and Measure
Accurate planning prevents errors and ensures compliance.
Identify Cable Path: Map the cable route, noting bends and supports.
Mark Fixing Points: Space cleats per manufacturer guidelines (typically 0.3–1.2 meters apart).
Check Alignment: Use a spirit level to ensure straight installation.
LSI Keywords: Cable cleat spacing, electrical cable support systems.
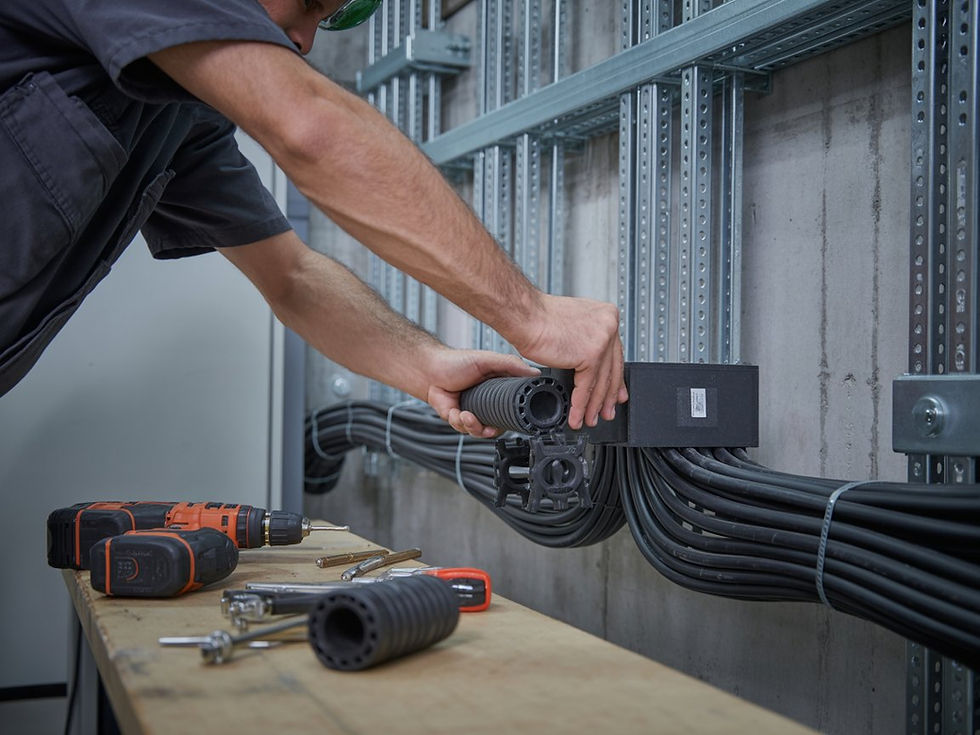
Step 4: Install the Cleats
Secure cleats to the surface with appropriate fasteners.
Drill Holes: Use a masonry or metal drill bit based on the surface.
Insert Fixings: Use wall plugs for concrete or bolts for metal trays.
Attach Cleats: Tighten bolts with a torque wrench to manufacturer-specified values.
Place Cables: Position cables in cleats without forcing them.
Expert Insight: Electrical engineer Sarah Thompson notes, “Over-tightening bolts can crack plastic cleats, while under-tightening risks loosening under vibration.”
Step 5: Inspect and Test
Ensure the installation is secure and compliant.
Check Alignment: Confirm cables are straight and cleats are evenly spaced.
Test Tightness: Use a torque wrench to verify bolt security.
Inspect Cables: Look for signs of stress or insulation damage.
Cable Cleat Installation for Outdoor Cables
Outdoor installations require additional considerations due to environmental factors.
Material Choice: Use stainless steel or UV-resistant polymer cleats to withstand weather.
Spacing: Reduce spacing (e.g., 0.6 meters) to counter wind or thermal expansion.
Corrosion Protection: Apply anti-corrosive coatings for coastal or industrial areas.
Grounding: Ensure cleats are grounded to prevent static buildup.
Case Study: A 2024 solar farm in Arizona used stainless steel cleats with 0.5-meter spacing, reducing cable maintenance costs by 30% over two years.
Read Also...Cable Cleat Installation for Outdoor Cables
Electrical Cable Cleat Installation Safety Tips
Safety is paramount during installation to protect workers and systems.
De-Energize Cables: Always work on de-energized systems unless unavoidable.
Use Insulated Tools: Prevent accidental shocks with insulated screwdrivers.
Follow Lockout/Tagout: Implement LOTO procedures to ensure system isolation.
Wear PPE: Use gloves, goggles, and helmets to minimize injury risks.
Train Workers: Ensure installers are certified in electrical safety standards.
Read Also...Electrical Cable Cleat Installation Safety Tips
Troubleshooting Cable Cleat Installation Issues
Address common problems to ensure a reliable installation.
Problem: Loose Cleats
Cause: Under-tightened bolts or incorrect fasteners.
Solution: Re-tighten with a torque wrench; replace mismatched bolts.
Problem: Cable Sagging
Cause: Excessive cleat spacing or weak support structure.
Solution: Add intermediate cleats or reinforce the support tray.
Problem: Corrosion in Outdoor Cleats
Cause: Non-weather-resistant materials.
Solution: Replace with stainless steel or coated cleats.
Problem: Cracked Cleats
Cause: Over-tightening or low-quality materials.
Solution: Use torque settings and high-quality cleats.
Read Also...Troubleshooting Cable Cleat Installation Issues
FAQs About Cable Cleat Installation
What is the standard spacing for cable cleats?
Standard spacing ranges from 0.3 to 1.2 meters, depending on cable type, weight, and environmental factors. Refer to IEC 61914 for specifics.
Can I use plastic cleats outdoors?
Plastic cleats are unsuitable for outdoor use unless UV-resistant. Stainless steel is preferred for durability.
How do I know if my cleats are properly installed?
Check for secure bolts, aligned cables, and no signs of stress or damage. Use a torque wrench for precise tightening.
What tools are needed for cable cleat installation?
Common tools include a drill, torque wrench, measuring tape, spirit level, and insulated screwdriver.
How do cable cleats enhance electrical safety?
Cleats prevent cable movement, reducing insulation wear, short circuits, and fire risks.
Conclusion
Proper cable cleat installation is critical for electrical safety, system reliability, and compliance with standards like IEC 61914. By following this step-by-step guide, selecting appropriate materials, and addressing troubleshooting issues, you can achieve a secure and durable installation. For outdoor projects, prioritize weather-resistant cleats and tighter spacing. Always adhere to safety protocols to protect workers and equipment. For further guidance, consult manufacturer specifications or a certified electrician.


Comments